lunes, 31 de diciembre de 2012

Palmeritas de almendra/ Almond heart-shaped puff pastry


¡¡¡FELÍZ AÑO A TODOS!!!

Ya os conté (el año pasado, jejeje) con las bolitas el percance con el mazapán de este año, pero ha seguido dando mucho juego. Como el regalo de navidad de este año de la familia eran dulces caseros varios, opté por incluir estas palmeritas para variar un poco y recliclar al mismo tiempo. El toque que le da la almendra es muy sutíl, pero contribuye a que ganen en sabor sobre las palmeritas habituales y modifica ligeramente la textura.
Felíz 2013 y disfrutadlo cocinando!! :)

INGREDIENTES: (Aprox. 20 palmeritas)
  • 1 rollo de masa de hojaldre (procurad que sea rectangular o tendréis que cortar y pegar para que se aproxime)
  • 3/4 taza de almendra picada
  • 1 1/2 tazas de azúcar
  • 2 cucharadas de mantequilla

Precalentar el horno a 180ºC
Desenrollar la masa de hojaldre, untadla bien con la mantequilla, y esparcir sobre ella la almendra picada y el azúcar.  Aplastad todo bien con un rodillo, pasándolo por encima de todo unas cuantas veces.
Enrollad los lados más largos hacia el centro hasta que se junten en el medio.
Preparad la bandeja de horno con papel antiadherente, un silpat o un papel de plata untado con mantequilla. Cortad la masa con un grosor de 1cm y colocadla en la bandeja de horno sin pegarlas demasiado porque al hornearse crecen.
Hornead hasta que estén doradas. Sacadlas entonces del horno y dejad que se enfrien sobre una rejilla.
Ya os las podeis comer :)
_________________________________________________

HAPPY NEW YEAR!!!

As I told you (last year, hahahaha) with the almond balls, we had some issues with this year's marzipan, but I've been using the almond and sugar in several treats. As this year's Christmas family presents were different kinds os sweet treats so I decided to include these puff-pastry hearts to recycle and introduce new things at the same time.
The almond touch is very subtle, but contributes to add flavour and texture to them.
Have a great 2013 and enjoy it cooking!! :)


INGREDIENTS: (Aprox. 20 hearts)
  • 1 puff pastry dough ( better if it's rectangular)
  • 3/4 cup grounded almond
  • 1 1/2 cups of sugar
  • 2 tablespoons of butter
Preheat the oven to 180ºC
Unroll the dough, spread the butter over it and sprinkle the almond and sugar.  Press with a rolling pin  (roll several times but don't make the dough thinner).
Roll the longest sides to the middle and make them touch in the centre.
Prepare an oven tray with a baking sheet, a silpat or aluminium foil with butter.
Cut the roll in 1 cm hearts and place them on the oven tray. Leave some space between them because as they bake they get bigger.
Bake until golden. Take them out of the oven, place them over a rack and wait a bit until they cool.
Now they are ready to eat! :)


viernes, 21 de diciembre de 2012

Bolitas de caramelo y almendra / Almond and caramel balls

El año pasado por estas fechas os expliqué cómo se hacía mazapán y que siempre lo hacía con mi padre... pues este año, por alguna causa que desconocemos el primer intento de mazapán nos salió mal, se cristalizó, y mi padre entró en crisis diciendo que era irrecuperable y pretendía tirar 1 kg de almendra y 2 de azúcar que habíamos echado ya.  Así que viendo que si no todo eso iba a terminar en la basura me lo traje a casa y me dediqué a experimentar con ello y, entre otras muchas cosas, hice estas riquísimas bolitas.

INGREDIENTES:
2 partes de azúcar
1 parte de almendra picada
1/2 parte de agua (inicialmente, porque luego le tendréis que añadir más poco a poco)
Cacao amargo en polvo

Poneis en un cazo o una sartén con fondo todos los ingredientes y lo calentáis a fuego medio. Removed de forma constante para evitar que se os pegue al fondo y queme. Cuando veáis que la masa empieza a estar demasiado densa (que la movéis con la cuchara y se despega del fondo) y que aun no tiene un color tostado (tipo toffee oscurito) agregad un par de cucharadas más de agua y seguíd moviendo.  Cuando veaís que ya tiene el color deseado y que se despega de las paredes del recipiente ligeramente dal moverlo, retiradlo del fuego y dejad templar.
Espolvorearos un poco de cacao en las mano y con una cucharita id sacando masa y haciendo las bolitas. Si queréis que queden bien cubiertas de cacao echad más cantidad de cacao en las manos.

Y, si no habéis estado picoteando mientra las estabais haciendo, ya es el momento de comérselas :)

__________________________________________________________

Last year I told you how to make marzipan and that I usually make it with my dad... but this year, while making it, we don't know what went wrong and it crystalize. My dad panicked saying there was no way of fixing it and intended to throw away 1 kg of almond and 2 kg of sugar. So I packed it and, seeing that if not it was going to end up in the bin, I brought it home and experimented with it and, one of the multiple things I made this delicious balls.

INGREDIENTS:
2 parts of sugar
1 part of almonds
1/2 part of water (initialy, but you'll have to slowly add some afterwards)
Powdered bitter cocoa

In a pan or saucepan put all the ingredients, except for the cocoa powder. Stir constantly to make sure it doesn't stick to the bottom and burn. If the dough starts to be too dense (once you are mooving it it detatches from the bottom) and it still doesn't have a dark golden color add a couple more tablespoons of water. Repeat until you obtain the wished colour.  As you've got the color and it gently detatches from the walls of the pan, take it out of the fire and let it cool. Spinkle some cocoa on your hands, get teaspoons of dough and start making balls.
If you want them very coated you can put some more cocoa in your hands and roll them again.
And now, if you haven't been eating as you were making them, it's time to eat!!! :)

jueves, 13 de diciembre de 2012

Hamburguesas de pollo y setas/ Chicken and mushroom patties


Estaba harta de oir a mi abuela y a mi madre decir que el pollo no sabe a nada y que les aburre comer filetes de pollo así que opté por añadirle setas a la propia carne de forma que le aporten, no solo una textura más jugosa, sino un gran sabor. 
Además, si últimamente andáis liados con cenas navideñas y casi no tenéis tiempo para andar preparandoos la comida de ese día o el día siguiente podéis congelarlas antes de freir y sacar cuando os las queráis hacer. Incluso os las podéis llevar como comida de tupper.

INGREDIENTES: (Para 4)
  • 4 filetes de muslo picados
  • 4 setas shiitake secas
  • 1 cucharada de salsa teriyaki + un poco más para echar por encima
  • 2 champiñones
  • 1 diente de ajo
  • 1/2 cucharadita de pimienta negra molida
  • 1 cucharadita de aceite.
  • Sal
  • Agua

En un cuenco poned agua templada (tirando a caliente) y meted a hidratar las setas. Colocad encima una cuchara o un plato para evitar que floten (tardarán entre media y una hora en hidratarse). Lavad el champiñón y picar a cuchillo.
Picad el pollo con una picadora o comprad carne de pollo picada (mejor si la picais vosotros porque no interesa que esté excesivamente picada)  y colocad en un bowl. Picad las shiitake.  Agregad el ajo picado, la pimienta las setas, el champiñón y la salsa teriyaki. Dejad que repose la mezcla de media a una hora para que los sabores se mezclen bien. Poned una sartén grande con el aceite a fuego medio-alto. Dadle forma de hamburguesitas (el tamaño que más os guste) y freíd hasta que estén doradas por los dos lados. Listas para comer :)
Las podeís acompanar de casi cualquier cosa.
______________________________________________________________

I was fed up of listening my grandma and mum that chiken was tasteless and that they were bored of eating chicken so I decided to add mushrooms inside the meat in order to obtain a juicier and tastful meat pattie.
Also, if these days you are busy with christmas diner and you are running short of time to prepare your meal (for that day or the next day) you can freeze them befor frying them and take them out when you need them. And it's also a great packlunch food.


INGREDIENTS: (For 4)
  • 4 deboned chicken thighs
  • 4 big dry shiitake mushrooms
  • 1 1/2 tablespoons of teriyaki sauce + some more to sprinkle over the patties once cooked.
  • 2 mushrooms
  • 1 garlic clove
  • 1/2 teaspoon of black ground pepper
  • 1 teaspoon of olive oil
  • Salt
  • Water
Pour warm-hot water  and add the shiitake mushrooms. Place over then a plate or spoon in order to keep tem under water at all times (it takes between 30min and 1h to rehidrate). Clean the mushroom and chop it into small pieces.
Ground the chicken with a mincer or buy grounded chicken meat (it's best if you mince it yourself because we'd rather obtain some chicken chunks) and place it in a bowl.
Chop the shiitake mushrooms. 
Add the garlic clove chopped, pepper, mushrooms, shiitake and teriyaki sauce. Let it settle for half an hour. Shape the patties (you decide on the size). Heat a big pan, add the teaspoon of oil and fry on both sides until they are golden. They're ready to eat :)
You can side them with almost everything.

jueves, 6 de diciembre de 2012

Tarta de queso con gotitas de chocolate/ Cheesecake with chocolate morsels


Siento apenas actualizar últimamente, entre trabajo y cosas varias que hacer no he tenido tiempo para cocinar nada que mereciese la pena y hacerle fotos (esto de que se haga de noche tan pronto es muy malo para hacer fotos con luz natural).
Esta receta es un clásico de G, así que se la tomo prestada para compartirla con todos vosotros. Es sencilla y rica, y la única pega que tiene es que requiere de horno (aunque a estas alturas de año casi se agradece).
Mi única variante es el echarle trocitos de chocolate. Una es gran fan del chocolate, así que desde la primera vez que probé la suya pensé que con unos cachitos de chocolate dentro tenía que estar muy buena.

INGREDIENTES
  • 250g queso fresco 
  • 125g de  yogur griego (1 yogur)
  • 1 vaso de yogur de harina
  • 1 vaso de yogur de azúcar
  • 3 vasos de yogur leche
  • 1 brick pequeño nata para montar
  • 1 sobre levadura  (16g)
  • 3 huevos
  • 100g de gotitas de chocolate
Precalentad el horno a 180º
En un cuenco grande se mezclan todos los ingredientes (menos el chocolate) y se baten con la batidora hasta conseguir una mezcla homogénea. 
Untar con mantequilla un molde de horno, enharinar, verter la mezcla anterior y repartid el chocolate por todo el molde.
Hornear durante 30-45 minutos  y cuando veaís que está bien dorada la sacáis del horno y  pincháis (para aseguraros que no esté cruda).

Se le puede dar una capa de mermelada de melocotón, fresa o frutos rojos (o la que más os guste) , pero si optáis por esto lo mejor es hacerlo nada más sacarla del horno cuando aun esté caliente.  
_______________________________________ 


I've been bussy working and planning different things lately, and that's been the cause of my few posts lately, as I've had no time for cooking and taking pictures (and the early sunset doesn't help either, as I can't take natural light pictures)
This recipe is a G's classic, so I borrowed it and share it with you. It's easy and really good, and the only drawback is that it requires of an oven (though at this time of year I'm grateful for it)
My only contribution has been adding chocolate. I'm a huge chocolate fan, so since the first time I tasted her cake I thought it ought to be great with some chocolate chips.


INGREDIENTS
  • 250g of "queso fresco" or drained cottage cheese
  • 125g greek yogurt
  • 1 yogurt of flour (yogurt container)
  • 1 yogurt of sugar
  • 3 yogurts of milk
  • 250ml of whipping cream
  • 16g of baking powder
  • 3 eggs
  • 100g chocolate morsels
Preheat the oven to 180ºC
In a big bowl mix all the ingredients (except the chocolate morsels) and blend them with an electric mixer until you obtain an uniform batter.
Grease an over pan, srinkle some flour over it and pour in the batter. Sprinkle the chocolate and bake for 30 to 45 min. Once you see it's dark golden, take it out of the oven and test to check it's well cooked.
If you plan putting some jam over it do it while it's still hot. You can use peach, stawberry, wild berries or whatever suits you  :)

jueves, 22 de noviembre de 2012

Filetes rusos estilo marroquí/ Moroccan style meat patties


Hacía tiempo que no hacía una receta de carne, quizás demasiado, pero siempre que pensaba en hacer una acababa dedicando mi tiempo a otras cosas. Hace años hice un curso de cocina marroquí, el único curso que he hecho de cocina en mi vida, y la verdad es que disfruté de él como una enana. 5 días cocinando y comiendo aquello que hacíamos en clase. De aquello saqué un montón de recetas (todas bien apuntadas) pero esta se convirtió en algo fácil y rápido de hacer, saliéndose ligeramente de los típicos filetitos rusos. Aquí os la dejo para que la hagais.


INGREDIENTES: (Para 4 personas)

  • 500g carne de ternera picada
  • 1/2 cebolla rallada
  • 2 cucharaditas de pimentón dulce
  • 1 cucharadita de pimentón picante
  • 1/2 cucharadita de comino en polvo
  • 2 cucharaditas de perejil picado
  • 2 cucharadas de pan rallado
  • 8 cucharadas de leche
  • 1 cucharada de aceite
  • Sal
En un plato hondo se coloca, bien esparcida, la carne picada y se añade la cebolla, los pimentones, la sal, el comino y el perejil. Mezclado todo bien (con las manos se mezcla mejor). Añadid la el pan rallado y la leche y volved a mezclarlo hasta que esté todo bien integrado. Dejad en la nevera durante al menos una hora para que la carne se impregne bien del sabor (si tenéis prisa podéis saltaros este paso).
Formad los filetitos del tamaño que más os apetezca, pero que por lo menos tengan un grosor de 1.5cm (mejor si no son excesivamente grandes).
Calentad una sartén, echad el aceite y freid.
Acompañadlo de arroz, patatitas o unas verduritas a la plancha.
¡Que aproveche :)!
 _____________________________________________
It's been a long time since I don't write a meat recipe, maybe too much, but everytime I thought about it I ended up making something else. Some years ago I attended a moroccan cooking course, the only cooking course I've ever done, and I enjoyed it so much. 5 days cooking and eating those things we made in class. I keep all the recipes (all well written), but this one ended up being a quick and easy recipe, out of the typical patties. I therefore leave you the recipe here expecting you try it.

INGREDIENTS: (For 4 )

  • 500g grounded beef meat
  • 1/2 finely grated onion
  • 2 teaspoons of sweet paprika
  • 1 teaspoon of spicy parpika
  • 1/2 teaspoon of powder cumin
  • 2 teaspoons of chopped parsley
  • 2 tablespoons of breadcrumbs
  • 8 tablespoons of milk
  • 1 tablespoon of oil
  • Salt
In a deep dish spread the grounded meat and add the onion, paprikas, salt, cumin and parsley. Mix everything (it blends better if hand mixed). Add the breadcrumbs and the milk and mix again to make sure it's evenly distributed. Let the meat settle in  the fridge for at least an hour to let the flavours blend with the meat (if you're in a hurry you can skip this step)
Form the patties of the size you prefere, but make sure they're at leat 1.5cm thick (an better if they're not too big)
Heat a pan, pour the oil, and fry them.
Side it with rice, potatoes (chips, fries or boiled) or roasted veggies.
Enjoy :)!

jueves, 8 de noviembre de 2012

Brownie


Con tanto puente que he tenido que trabajar y festivos en general apenas he tenido tiempo para andar cocinando nada. Sin embargo, la lluvia alentaba a poner el horno y comer cosas dulces, así que hice un brownie clásico para aliviar las penas. Os dejo aquí la receta, por si con la lluvia os da pereza salir de casa y queréis aprovechar para tener, en un periquete,  un buen desayuno o postre :)

INGREDIENTES
  • 75g mantequilla
  • 200g chocolate cobertura
  • 2 huevos
  • 3 cucharadas de agua
  • 100g de azúcar
  • 100g harina
  • 2 cucharadas de cacao amargo
  • 150g de chocolate picado o pepitas de chocolate
  • 100g de nueces
Precalentad el horno a 180º
Fundid la mantequilla con el chocolate (al baño María o con microondas)  y cuando esté bien deshecho mezclad con el azúcar hasta que esté bien disuelta. Añadid los huevos y el agua y batidlo bien todo. Por último agregad  la harina, el cacao amargo y el bicarbonato. Cuando esté toda la masa sin grumos y unificada echad las nueces y el chocolate picado.
Untad una bandeja rectangular de horno de 35 x 25 cm, echad la mezcla y hornear durante 30 min. aproximadamente. Pinchad para aseguraros que no se queda crudo.
Sacadlo del horno y a partir de ese momento ya lo podéis comer como y cuando queráis. Eso si, no seáis avariciosos y dejad un poquito para vuestros amigos o familia :)
______________________________________________

With all these bank hollidays that I've been working I've been out of time to cook. However, the rain made me want to turn the oven on, so I made a regular brownie to make me forget it hasn't stopped raining for a while. I leave you here the recipe, in case you feel lazy about going out because it rains and you want to use that time in baking a good  and quick breakfast or dessert :)


INGREDIENTS
  • 75g butter
  • 200g dark chocolate
  • 2 eggs
  • 3 tablespoons of water
  • 100g of sugar
  • 100g of flour
  • 2 tablespoons of bitter cocoa powder
  • 150g of dark chocolate chunks or morsels
  • 100g of chopped nuts
Preheat the oven to 180º
Melt the butter and the chocolate (microwave or bain Marie) and when it's mixed add sugar and stir until it disolves. Add the eggs and water and beat thoroughly. Join in the flour, cocoa and baking soda and one it's all without lumps, the nuts and chopped chocolate.
Spread butter in a 35 x 25 cm baking tin and bake for around 30min. Test to make sure it's not undercooked.
Take it out of the oven and it'll be ready to eat whenever you want to. Just one thing, don't be gready and leave some for your friends or family :)

jueves, 25 de octubre de 2012

Tartaleta de ciruelas y melocotón / Peach and plum tart


Todos los años me planteo en verano hacer una tartaleta de melocotones, pero debido a esa política de no usar el horno en verano, todos los años se me pasa hacerla. Sin embargo este año, aprovechando que han durado bastante tiempo las ciruelas en el mercado, por fin he podido hacer  esta otra tartaleta que también me rondaba desde hace tiempo.

INGREDIENTES:

  • 15 ciruelas moradas
  • 1 melocotón grande
  • 2 huevos
  • 200ml de nata líquida
  • 4 cucharadas de azúcar
  • 1/2 cucharadita de canela
  • Masa quebrada
  • Mantequilla

Precalentad el horno a 180º y poned la bandeja del horno en la sección media inferior del horno.

Mientras el horno se va calentando pelad el melocotón y las ciruelas y deshuesadlos. Partid las ciruelas en cuartos y el melocotón en laminitas finas. En un cuenco grande mezclad la nata con los huevos, la canela y una cucharada de azúcar.
En un molde circular, untad la base con mantequilla y colocad la masa quebrada encima, asegurándoos que llegue bien a todos los bordes por igual para que luego no se salga el relleno. Pinchadla con un tenedor y metedla al horno hasta que esté ligeramente dorada. Sacad del horno.
Espolvorear sobre la base 2 cucharadas de azúcar y sobre ellas colocad las láminas de melocotón y encima, los cuartos de ciruela. Cubrid todo con la mezcla de los huevos y la nata, espolvoread con la cucharada de azúcar restantes y devolved al horno. Hornead durante 15-20 minutos, procurando que la masa no se os queme. Sacadla del horno y dejad que repose un rato antes de desmoldarla.
Que aproveche :)
_____________________________________________


Every year I think about making an apricot tart, but due to the non oven policy during the summer we have at home, I can't ever make it. However, this year, thanks to the long plum season we've had, I could finaly make this other tart that had been in my mind for a long time.  
 
INGREDIENTS:
  • 15 purple plums
  • 1 big peach
  • 2 eggs
  • 200ml cream
  • 4 tablespoons of sugar
  • 1/2 teaspoon of cinnamon
  • Shortcrust pastry
  • Butter

Preheat the oven to 180º and place the oven tray in the half-lower section of the oven.
While the oven is preheating peel the peach and plums and debone them. Cut the plums in 4 and the peach in thin slices. In a big bowl mix the cream, eggs, cinnamon and a tablespoon of sugar.
In a round cake tin spread the butter and place the shortcrust pastry over it, making sure all the sides are even to avoid the filling from spilling. Pinch with a fork  and bake until slightly golden. Take it out of the oven.
Sprinkle 2 tablespoons of sugar in the base and place over them the peach slices and over them the plums.  Cover everything with the egg and cream mix and sprinkle the remaining tablespoon of sugar over all before introducing it again in the oven. Cook for 15 to 20 minutes, makinf sure the crust doesn't burn. Take it out of the oven and let it settle before eating.
Enjoy it :)!

jueves, 18 de octubre de 2012

Rollitos de verduras al vapor/ Steamed vegetable rolls

A mitad de camino entre los Dim-sum y los rollitos vietnamitas se encuentran estos rollitos vegetales al vapor. La inspiración me vino de unos que hacía M en Bruselas, donde una vez a la semana cocinabamos algo tipico de nuestros países cada uno de los de la casa en la que vivía. Ella me miraba raro por ser capaz de tener 5 tipos de queso solo para mi en la nevera y por comer a las 14.30 y yo me sentía fascinada por los (de media ) 8 cuenquitos con los que se alimentaba, cada uno relleno de una pequeña cantidad de comida vietnamita distinta. Una noche M hizo una gran cantidad de rollitos para cenar, eso si, ella los de ella eran fritos, pero concluimos que al vapor tenían que estar buenos y más ligeros, y de ahí salieron estos.

INGREDIENTES: (Para 15 rollitos)
  • 1 zanahoria
  • 1 puerro
  • 1/4 repollo
  • 4 setas shiitake secas
  • 4 champiñones
  • 1 cucharadita de azúcar
  • 1/2 cucharadita de jengibre fresco rallado
  • 6 cucharadas de salsa de pescado
  • 2 cucharadas de aceite
  • 15 Hojas de papel de arroz.
  • Pimienta
  • Sal

En una taza con agua caliente rehidratad las shiitake durante 30 minutos (al sacar las setas no tiréis el agua que necesitaréis algo después).
Lavad y pelar la zanahoria y el puerro y picadlos en trocitos pequeños. En una sartén grande poned el aceite a calentar y agregad las verduras para que se vayan cocinando a fuego medio. Mantened tapadas para que se reblandezcan antes. Mientras tanto id picando el repollo y aclarándolo. Cuando veaís que la zanahoria empieza a estar blanda añadíd a la sartén el repollo y volver a tapar. Poco a poco el repollo irá reduciendo volumen. Dejad que se cocine durante 5 minutos y agregad las shiitake picadas, el azúcar, los champiñones picados, el jengibre, la salsa de pescado y un par de cucharadas del agua de las setas.  Volved a taparlo y esperad a que se cocine todo junto durante unos 10 minutos. El repollo no tiene que estár demasiado blando, así que si veís que empieza a cocinarse en exceso antes de los 10 minutos, retirad la sartén del fuego.
Dejad que se enfrie la mezcla antes de hacer los rollitos.
Mojad las hojas de papel de arroz y colocadlas sobre una superficie limpia para que se vayan reblandeciendo. Poned una cucharada generosa de verduras en un extremo de cada hoja y enrollad (doblad las esquinas hacia el centro y enrollad el resto hasta formar un paquetito)
Cocinadlo en una vaporera durante 5 minutos o hasta que veaís que la pasta empieza a estar más blanquecina.
Os recomiendo comerlos con la salsa que hice para esta receta, pero con salsa de soja con un poquito de vinagre también están buenísimos. 
¡Que aprovechen :)!
____________________________________________

Half-way through the dim-sum and the vietnamese rolls are this steamed rolls. The inspiration came from ones that M made in Brusels, where once a week, in the house I lived in, we cooked something typical from our home countries. She considered weired me having 5 types of cheeses in the fridge and being able to eat at 14.30 and I was always fascinated by the (around) 8 bowls sheused to feed of, each one with a small quantity of vietnamese food. One night M made for dinner a lor of rolls, her's were fried,  but we concluded that steaming them had to be just as light and tasty, so from there I made these.


INGREDIENTS: (For 15 rolls)
  • 1 carrot
  • 1 leek
  • 1/4 cabbage
  • 4 dried shiitake mushrooms
  • 4 mushrooms
  • 1 teaspoon of sugar
  • 1/2 teaspoon of fresh grated ginger
  • 6 tablespoons of fish sauce
  • 2 tablespoons of olive oil
  • 15 Sheets of edible rice paper
  • Pepper
  • Salt
In a cup with hot water rehidrate the shiitake for around 30 minutes (once you get the shiitake out don't throw away the water as you will need some afterwards)
Rinse and peel the carrot and the leek and chop them in small pieces. In a big pan heat the oil and add the vegetables, letting them cook to medium heat. Keep them covered so they soften more quickly. Meanwhile chop and rinse the cabbage. Once you see the carrot starts to soften add the cabbage and cover again. The cabbage will reduce it's volume slowly, so let it cook for 5 minutes and add the chopped shiitake and mushrooms, the sugar, ginger, fish sauce and a couple of tablespoons of the mushroom's water. Cover again and let ir cook for 10 minutes. The cabagge musn't be too soft, so if it starts to be soggy before 10 minutes have passed take the pan out of the fire earlier.
Let the vegetable mix cool.
Soak the rice paper sheets in water and place them over a clean surface so they can start to get soft. Place a tablespoon of vegetables on one side of the sheet and fold (fold the sides to the middle and roll until you obtain a small roll)
Cook in a steamer for 5 minutes or until you see that the rice paper starts to become more white.
I recomend you eat it with this sauce, but it's just as good with soy sauce and a bit of vinegar.
Enjoy it :)!

jueves, 11 de octubre de 2012

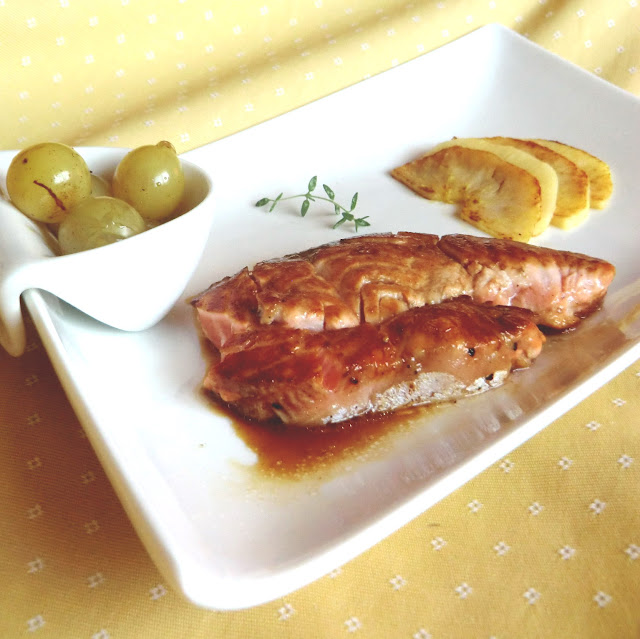
Salmón con manzana y uvas/ Apple and grape salmon


El salmón es de esos pescados que son facilmente acompañables, ya que parece que todo le va bien.
Como la receta es bastante rápida es estupenda para este fin de semana largo, en el que seguramente tendréis mil cosas que hacer y menos tiempo para comer. Ah, y también queda bien como comida de tupper, porque el salmón queda jugoso y las uvas y la manzana son el complemento perfecto para contribuir a la jugosidad del plato.

INGREDIENTES: (Para 4)
  • 4 rodajas de salmón sin piel ni espinas
  • 1 manzana
  • 20 uvas
  • Zumo de 1 limón
  • 8 cucharadas de Pedro Ximénez (u otro vino dulce)
  • 2 cucharaditas de aceite de oliva
  • Sal
  • Tomillo
  • Azúcar
  • Pimienta

Limpiar de espinas y quitar la piel al salmón (si es que no conseguís que lo haga vuestro pescadero por vosotros). Colocadlo en un recipiente hondo con el zumo de limón, una cucharadita de azúcar, un poco de tomillo y pimienta. Dejad que repose durante media hora.
Lavad y despepitar las uvas (podéis ponerlas enteras también si estáis vagos). Colocadlas en un cazo con una cucharadita de aceite y sofreid a fuego fuerte hasta que empiecen a tomar color. Agregad  6 cucharadas de Pedro Ximénez, tapad y dejad que vayan cocinándose a fuego lento hasta que las uvas estén blandas. Si veis que se quedan secas muy rápido agregad un poquito de agua.
Pelad, cortad por la mitad, descorazonad y partid en rodajas la manzana. Poned el aceite de oliva en una sartén amplia a calentar y freid la manzana hasta que esté dorada por ambas caras. Sacad la manzana y en esa misma sartén subid el fuego y haced el salmón. Cocinad por una cara a fuego fuerte, y cuando le deis la vuelta, añadid las 2 cucharadas sobrantes de Pedro Ximénez, tapad, retirad del fuego y emplatad con las manzanas y uvas.
Que aproveche :)
________________________________________________________


Salmon is one of those fishes that go well with almost everything.
AS this recipe is quite quick, is perfect for this long weekend in which you will probably have a thousand things to do a little time for eating. And BTW, it's also great as a lunchpack recipe, as the salmon is quite juicy and the grapes and apple contribute to the final juiciness.

INGREDIENTS: (For 4)
  • 4 salmon slices (skin and boneless)
  • 1 apple
  • 20 grapes
  • 1 lemon juice
  • 8 tablespoons of  Pedro Ximénez (or any other sweet wine)
  • 2 teaspoons of olive oil
  • Salt
  • Thyme
  • Sugar
  • Pepper

Clean the bones and skin of the salmon (if you couldn't manage the fish dealer to clean it for you). Place it un a deep tray with the lemon juice, a teaspoon of sugar, thyme and pepper. Let it settle for half an hour.
Rinse and take the seed from the grapes (if you're feeling lazy you can serve them whole). Put them in a saucepan with a teaspoon of oil and stirfry to high heat until they start to slightly change colour. Pour in 6 tablespoons of Pedro Ximénez, cover with a lid, and let it cook to low heat until the grapes start to soften. If it starts to dry, before the grapes are soft, you can add some water.
Peel, cut in half, take out the seeds and slice the apple. In a big pan put the remaining olive oil and fry the apple until it's golden on both sides.
Take the apple out and in that same panrise the heat and cook the salmon. Once one side is cooked, turn around, pour the 2 remaining tablespoons of Pedro Ximénez, cover with a lid, take it out of the fire and place in the plate with the grapes and apple.
Enjoy :)

jueves, 4 de octubre de 2012

Aros de cebolla crujientes / Crispy onion rings

Adoro la cebolla en todas sus formas, pero los aros de cebolla son de lo que más me gusta. Eso si, no me valen de cualquier tipo. Me gustan mucho los que están empanados, con la cebolla gorda y jugosa dentro o cuando son finitos y muy crujientes. Sin embargo hay en sitios que los hacen con un rebozado que tiende a quedar grasiento y que le quita parte de la gracia a la cebolla que  debería ser la protagonista absoluta. Aquí os dejo una receta muy fácil de los aros finitos y crujientes, para que la pongáis de picoteo o para acompañar cualquier plato :)


INGREDIENTES:
  • 1 cebolla grande
  • 1 vaso de leche
  • 1 cucharadita de zumo de limón
  • 2 1/2 cucharadas de harina de trigo
  • 1 cucharada de harina de garbanzos
  • Sal
  • Aceite

En un plato hondo volcad el vaso de leche y añadid la cucharadita de zumo de limón. Dejad que repose durante unos 10 minutos.
Pelad la cebolla y partida en aros muy finos. Podéis utilizar una mandolina o cortalo a mano con un cuchillo afilado. Separad bien los aros y sumergid en la leche.
En una bolsa  (de las de sandwich) poned las harinas y una cucharadita de sal. Sacad la cebolla de la leche, metedla en la bolsa, cerradla (dejando mucho espacio para que se pueda mover) y agitad con fuerza para que toda la cebolla se unte bien con la harina.
Calentad en una sarten el aceite (un par de dedos de alto) y cuando esté bien caliente id echando la cebolla bien repartida por toda la sartén sin que se os amontone. Tendréis que freirla en varias tandas. Dadle la vuelta para aseguraros que esté dorada por todos los lados.
Sacad a papel absorvente y servid :).
_________________________________________________

I love onions in all shapes and kinds, but onion rings may be as I love them most. Just one thing, I don't like any kind of onion ring. I enjoy a lot those coated with bread crumbs, were the onion is thick and juicy, or those thin and crispy.  Nevertheless, there are places where onion rings are coated in a thick batter that ends up beeing greasy and makes you forget the onion, that's suposed to be the absolute star. Here I propose you an easy recipe for the crispy and thin rings, so you can offer them as appetizers or as a side to any other dish :)

INGREDIENTS:
  • 1 big onion
  • 1 glass of milk
  • 1 teaspoon of lemon juice
  • 2 1/2 tablespoons of wheat flour
  • 1 tablespoon of cheakpea flour
  • Salt
  • Oil
In a soup dish pour the milk and lemon juice. Let it settle for about 10 minutes.
Peal the onion and cut it in very thin slices. You can cut it with a mandoline or with a very sharp knife.  Separate the rings and dip them in the milk.
In a bag (a sandwich bag) put the flours and a teaspoon of salt. Take the onion out of the milk, put it in te bag, close it (leaving enough space for it to move) and shake until all the onion in the bag is well coated.
In a pan heat the oil (about 3cm high) and when it's hot start frying the onion. Spread it out in the pan to make sure it fries well. You'll have to fry it in several batches. Turn it to make sure it's golden brown on both sides.
Take out of the pan to kitchen paper and serve :)


jueves, 27 de septiembre de 2012

Tarta de zanahoria en taza/ Mug carrot cake


Hasta que el otoño por fin ha hecho acto de presencia, no podía estar más sin hacer una tarta, así que busqué y busqué hasta que encontré ésta receta de tarta de zanahoria, que no solo es hiper rápida, sino que queda rica y jugosa. Para variar, modifiqué algunos de los ingredientes y las cantidades para que quedase aun más a mi gusto y el resultado es estupendo :)
(Nota: 1 cup = 250ml)

INGREDIENTES: (3 tazas grandes o 6-8 pequeñas)
  • 1/4 cup azúcar
  • 1/4 cup azúcar moreno
  • 3/4 cup harina
  • 1/4 cup aceite de oliva
  • 1 huevo
  • 1 cup zanahoria rallada
  • 1/4 cucharita de nuez moscada
  • 1 cucharadita de canela
  • 1 cucharadita esencia de vainilla
  • 1 pizca de sal
  • 1 cucharadita de levadura
  • 1 1/2 cucharada de pasas
  • 3 nueces picadas
Decorar:

  • Azúcar glass
  • Nueces
  • Queso untable
Lavad y rallad la zanahoria y mezcladla con el azúcar moreno. Dejad reposar durante 10 minutos.
En un cuenco mezclad el azúcar, la vainilla, el aceite y el huevo, batiendo hasta que el azúcar esté disuelta. Añadid la harina, la canela, la nuez moscada, la pizca de sal y la levadura. Mezcladlo todo bien hasta que no quede ningún grumo e incorporar la zanahoria, las pasas y las nueces picadas.
Volcad la masa en las tazas (pequeñas o grandes) llenándolas hasta la mitad.
Meted al microondas la taza y cocinar durante 1 minuto (si es pequeña) o 2 (si es grande) o hasta que veaís que ha subido bien la masa.
¡Cuidado al sacarla que quemará!. Dejad que se tibie.
Cubrir con queso untable , espolvorear con azúcar glass y decorar con las nueces.
Así de rápido :)
__________________________________________________
Before autum finally arrived, I couldn't stand not making a cake for more so I searched and searched until I found this carrot cake recipe, that's not only hyper quick, but good and moist. As always, I modified some of the ingredients and quantities so it matched my taste, and it came out just great :)

INGREDIENTS: (3 mugs or 6-8 espresso cups)
  • 1/4 cup sugar
  • 1/4 cup brown sugar
  • 3/4 cup flour
  • 1/4 cup olive oil
  • 1 egg
  • 1 cup grated carrot
  • 1/4 teaspoon nutmeg
  • 1 teaspoon cinnamon
  • 1 teaspoon vanilla essence
  • 1 pinch of salt
  • 1 teaspoon baking powder
  • 1 1/2 tablespoon raisins
  • 3 chopped walnuts
Decoration:
  • Powder sugar
  • Walnuts
  • Cream cheese
Rinse and grate the carrot and mix it with the brown sugar. Let it settle for around 10 minutes.
Mix in a bowl the white sugar, vanilla, oil and egg, and beat until the sugar is well dissolved.
Add flour, cinnamon, nugmeg, salt and baking powder. Continue mixing until there are no lumps and add the carrot, raisins and nuts.
Pour the batter in the mugs (espresso or mugs) and half fill them.
Put the espresso cup in the microwave and cook for a minute or cook for 2 if it's a mug, or until you see it has risen.
Beware it will burn! Let it cool slightly.
Cover with the cream cheese, sprinkle with powder sugar and decorate with nuts.
It's that quick :)

jueves, 20 de septiembre de 2012

Crema de cebolla/ Onion cream soup

Va a hacer un año desde que llegase al Museo del Prado la exposición de Renoir. Una de las mejores piezas que llegaron (para mi al menos) fue este cuadro de cebollas.
Proveniente del Clark Art Institute y pintado por Renoir en 1881 el cuadro nos presenta unas cebollas con aspecto fresco y jugoso perfectas para ser cocinadas y que aporten todo el sabor.
La receta, inspirada en ellas y en una crema que tomé con mi amigo L hace poco.


INGREDIENTES (para 3)
  • 2 cebollas grandes
  • 700ml de agua
  • 1 avecrem de pollo
  • 2 quesitos
  • 2 patatas medianas
  • Sal
  • Pimienta
  • 2 cucharadas de aceite de oliva
  • 1 brizna de romero
Pelad las cebollas y las patatas, partidlas en trozos poned en una cazuela con el aceite y una pizca de sal a cocinar a fuego medio. Tapadlo, removerlo de vez en cuando para que no se queme, y dejad que se poche hasta que la cebolla esté dorada y blanda. Cuando esté bien cocinado todo (unos 10 minutos), agregad el agua, un poco de pimienta y el avecrem (si tenéis caldo de pollo, 700ml de caldo en vez del avecrem y agua). Dejád que cueza durante 10-15 minutos a fuego medio.  Retirad del fuego, agregar los quesitos y el romero y batid con la batidora.
Servid calentito, acompañado de croutons y decorando con un poquito de romero si os apetece.
¡Que aproveche! :)
__________________________________________________________________
It's gonna be a year since the Renoir exhibition arrived to the Prado Museum, in Madrid. One of the best paintings (at least for me) was this one, called The Onions.
Coming from the Clark Art Institute and painted by Renoir in 1881, it presents some fresh and juicy onions, perfect to cook and share all their flavour.
The recipe is inspired in them and in a soup I recently had for lunch with my friend L.
INGREDIENTS (For 3)
  • 2 big onions
  • 700ml water
  • 1 chicken stock cube
  • 2 spreadable cheese wedges
  • 2 medium size potatoes
  • Salt
  • Pepper
  • 2 tablespoons of olive oil
  • 1 rosemary leaf
Peel the onions and potatoes, cut them into pieces and put them in a saucepan with the olive oil, a pinch of salt and cook to medium heat. Cover it, stir now and then to ensure it doesn't burn, and let it soften and golden. Once it's well cooked (around 10 minutes), add water, some pepper and the stock cube (if you've got chicken stock, add directly 700ml of stock and no cube or water). Let it boil for 10 to 15 minutes to medium heat. Remove from fire, put in the cheese wedges and the rosemary and blend with the blender until smooth.
Serve hot with some croutons and, if you like, decorated with some rosemary.
Enjoy! :)

jueves, 13 de septiembre de 2012

Calabacines rellenos de verdura/ Vegetable stuffed zucchini


Puesto que la vuelta al cole ha hecho que se ponga tan de moda el tupper, y para todos aquellos que aunque no van al cole tienen que optar por este método para comer allá donde trabajan, os propongo una receta saludable, sabrosa, jugosa y que queda muy bien recalentada.

INGREDIENTES (Para 4)
  • 2 calabacines grandes
  • 1/2 puerro pequeño
  • 1 zanahoria mediana
  • 1/2 pimiento verde
  • 5 champiñones
  • 4 tomates secos confitados
  • 2 cucharadas de tomate frito
  • 1 cucharadita de pasta de concentrado de tomate
  • 1 cucharadita de perejil picado
  • 1 cucharadita de tomillo
  • Agua
  • Pimienta
  • Sal
  • 3 cucharadas de aceite de oliva
  • Alioli o mayonesa con ajo
Lavad y secar los calabacines, el puerro, la zanahoria, el pimiento y los champiñones. Partid los calabacines longitudinalmente por la mitad y metedlos al microondas, con un poco de agua en la base del plato, para que se hagan (como siempre, el tiempo que los tengáis dentro dependerá de vuestro microondas y del tamaño de los calabacines). Una vez la pulpa esté blanda sacadlos y dejad que se enfrien.
Por otro lado partid el pimiento, el puerro y la zanahora en trocitos pequenos (como de 0.5cm), ponedlos a fuego suave en una sartén con el aceite y tapadla. Dejad que se vayan reblandeciendo. Cuando estén bien pochadas agregad el champiñón y los tomates secos (también trozos pequeños) y cocinad destapado.
Mientras se va haciendo la verdura, con una cucharita, vaciad la pulpa de los calabacines (procurando no romper la piel) y picadla con un cuchillo. Una vez todo empiece a estar bien cocinado subid el fuego y agregad la pulpa a la sartén. Sofreid hasta que desaparezca parte del agua que va a soltar y agregad el tomate frito, el perejil picado, el tomillo, la pasta de tomate y 1/2 vaso de agua. Dejad que se cocine todo junto a fuego medio hasta que la mezcla esté compacta.
Salpimentad la parte interior de las pieles de calabacín, colocadlas en una bandeja de horno y rellenadlas con la mezcla de verduras. Poned una cucharadita de alioli encima de cada trozo y gratinad.
¡Que aproveche! :)
__________________________________________________________


As the return to school has made a fashion out of the packed lunch eating, and for those who even if they don't attend school eat from one at work, I propose you a healthy, flavourful and succulent recipe, that, BTW it's very good reheated.

INGREDIENTS (For 4)
  • 2 big zucchini
  • 1/2 medium size leek
  • 1 medium size carrot
  • 1/2 green pepper
  • 5 mushrooms
  • 4 confited sundried tomatoes
  • 2 tablespoons fried tomato (passata)
  • 1 teaspoon concentated tomato paste
  • 1 teaspoon of chopped parsley
  • 1 teaspoon of thyme
  • Water
  • Pepper
  • Salt
  • 3 tablespoons of olive oil
  • Aioli or garlic mayonnaise
Rinse and dry the zucchini, leek, carrot, green pepper and mushrooms. Cut the zucchini in half longwise and introduce them in the microwave with a bit of water in the base of the plate (the cooking time will vary from one microwave to another depending on it's power and the zucchini size). Once the pulp is soft, take them out of the microwave and let them cool.
Meanwhile, chop the leek, pepper, carrot into small pieces (about 0.5cm) and cook them in a pan with the oil to low heat and covered. Let the vegetables soften. Once they are well cooked add the mushrooms and the confited tomatoes (also in small pieces) and let it cook without covering it.
As the vegetables continue cooking, with a spoon, empty the pulp from the zucchini (try not to break the skins) and chop it with a knife. Once it's all cooked rise the heat and add the pulp to the pan. Fry a bit until the extra liquid dissapears and add the parsley, thyme, fried tomato, tomato paste and 1/2 a glass of water. Let the mix cook until you've got a compact paste.
Salt and pepper the zucchini skins, place them in an oven tray and stuff them with the vegetables. Top with a teaspoon of aioli and grill.
Enjoy it! :)


jueves, 6 de septiembre de 2012

Tomates rojos fritos/ Fried red tomatoes


Hace muchísimos años vi la película Tomates verdes fritos y pensé que tenía que hacer algo parecido un día en casa con tomates rojos, ya que una es de ciudad y lo de encontrar tomates verdes es complicado. Algo así como 14 años me ha llevado a por fin animarme a hacerlo. En este caso los tomates no eran verdes, sino rojos de pera, con la idea de que aportasen un poco más de sabor.
Por supuesto lo podéis poner como aperitivo (en vez de unas coquetas) o de acompañamiento del plato principal.
 
INGREDIENTES: (Para 4)
  • 4 tomates de pera
  • 1/2 diente de ajo
  • 1 huevo
  • Pan rallado
  • 1/2 cucharadita de perejil picado
  • Sal
  • Aceite
  • Alioli (para acompañar)
 
Lavad y secad bien los tomates. Se parten en rodajas de 1.5cm y se salan. Picad el ajo y batidlo junto con el huevo y el perejil. Extended el pan rallado un un plato, rebozad las rodajas de tomate, pasadlas por el huevo y volved a pasarlas por el pan.
Calentad el aceite en una sartén grande (1cm de alto) y cuando esté bien caliente freid las rodajas de tomate hasta que estén doradas por ambas caras. Sacad a papel secante y servid calentitos con un poquito de alioli ligerito para mojar, o solos que están también muy ricos :)
______________________________________________________

Many years ago I saw the film Fried green tomatoes and thought that I had to do something similar at home but with red tomatoes, as i live in a city and finding green tomatoes is difficult. It has taken me 14 years or so to finally make them. In this case they weren't green tomatoes, but red pear ones, looking forward to enhace the recipe with their flavour.
Of course this can be an appetizer (instead of croquettes) or siding the main course.
 
INGREDIENTS: (For 4)
  • 4 pear tomatoes
  • 1/2 garlic clove
  • 1 egg
  • Breadcrumbs
  • 1/2 teaspoon of fresh chopped parsley
  • Salt
  • Oil 
  • Alioli (for dipping)
Rinse the tomatoes and dry them. Slice them in 1.5cm pieces and salt them. Chop the garlic clove and beat it with the egg ans parsley.
Put the breadcrumbs in a plate, coat the tomato slices and then put them in egg and re-coat them.
In a big pan heat the oil (about 1cm high) and when it's hoy fry them until they are golden on both sides. Take out of the pan to some kitchen paper (to extract the extra oil) and serve hot with some light alioli or any other dipp, or you can also eat them plain. :) 


jueves, 30 de agosto de 2012

Tortitas de manzana/ Apple pancakes


He de admitir que esta receta fue fruto de no querer poner el horno con el calor que hace. Mi sueño era hacer una tarta de manzana, pero era consciente que poner el horno se acercaba al masoquismo, así que tras un rato buscando por internet a ver si había alguna receta de tartas/galletas o algo parecido que se pudiese hacer en sartén, y no encontrarlo, opté por una modificación a la receta de las tortitas.

INGREDIENTES:
  • 1 manzana reineta grande
  • 2 cucharadas de sirope de arce
  • 1 1/2 cucharadita de levadura
  • 1/2 vaso de leche
  • 1 huevo
  • 4 cucharadas abundantes de harina
  • 1 cucharada de aceite
  • 1 pizca de sal
  • 1/2 cucharadita de canela
  • 3 nueces picadas

Pelad la manzana y ralladla con los agujeros más grandes del rallador. Mezcladla con el sirope de arce y dejad que se mezclen los sabores.
En un cuenco grande poned la harina, la levadura, la pizca de sal y la de canela. En otro cuenco batís el huevo ligeramente y lo mezclaís con el aceite, la leche y la manzana. Añadid la mezcla líquida a la sólida y removed solo hasta que esté sin muchos grumos.
Calentad una sartén y poned una cucharada de masa para cada mini tortita. Cocinad a fuego medio y cuando veaís que empiezan a romperse las pompas que salen, dadles la vuelta y dejad que se tuesten por el otro lado.
Podéis acompañarlas con lo que más os guste, desde más sirope de arce, azúcar y canela, hasta chocolate o nata montada. Que aproveche :)
_________________________________________________


I must admit that this reacipe it's the result of not wanting to turn the oven on, as it's really hot around here.  I dreamt about an apple cake, but I realised that turning on the oven was close to masoquism, so after a while searching through the internet for a cake or cookie recipe that I cook cook in a pan, and not finding it, I decided to make a slight change to my pancake recipe.


INGREDIENTS:
  • 1 big apple
  • 2 tablespoons of maple syrup
  • 1 1/2 teaspoon of baking powder
  • 1/2 cup of milk
  • 1 egg
  • 4 tablespoons of flour
  • 1 tablespoon of oil
  • 1 pinch of salt
  • 1/2 teaspoon cinnamon
  • 3 chopped walnuts

Peel the appple and grate it with the biggest holes of your grater. Mix the apple with the maple syrup and let the flavours mix.
In a big bowl put the flour, baking powder, cinnamon, salt and cinnamon. In another one slightly beat the eggs and mix it with the oil, milk and apple. Pour the liquid mix into the dry ingredients and stir until you disolve the lumps.
Heat a pan and put a tablespoon of mix for each mini pancake. Cook to medium heat, until the bubbles start to break, turn them around and cook until golden.
You can serve them with whatever you prefer, from more mapple syrup, sugar and cinnamon to chocolate or whipped cream. Enjoy :)

jueves, 16 de agosto de 2012

Crema de berenjena / Eggplant dip


He de admitir que soy una gran fan de la berenjena. Extrañamente, de pequeña me sentaban mal, y ahora no solo no me sientan mal sino que me encantan en cualquier de sus formatos. Esta crema es una ligera variante al plato típico mediterráneo conocido como babaganoush o mutabal. Digo que es una ligera variante porque en vez de tener el característico aroma ahumado que tienden a tener los dos platos ya mencionados, como en este caso vamos a usar el microondas para cocinar la berenjena, el plato va a tener un sabor más suave. Además, es el perfecto entrante para comer con pan de pita, tortillas mejicanas, patatas fritas... al margen de muy rápido de hacer.
 
 
INGREDIENTES:
  • 2 berenjenas
  • 1 diente de ajo
  • 2 cucharadas de aceite de oliva
  • 1 cucharadita de comino
  • 1/2 cucharadita de tahine (opcional)
  • Sal
 
Todo lo que tenemos que hacer es lavar las berenjenas enteras y ponerlas en un plato, sin secarlas, con un poquito de agua en el fondo y meterlas al microondas unos 6-7 minutos. El tiempo dependerá del tamaño de estas pero cuando las toqueis y veais (sin quemaros) que cede con facilidad ya estarán.
Partid las berenjenas por la mitad y esperad a que se enfríen un poco. Cuando estén templadas, con una cucharita vaciad la carne y ponedla en el vaso de la batidora. A esto agregadle el ajo, el aceite de oliva, la sal, el tahine y el comino y batidlo con la batidora hasta que obtengais una crema ligera.
Ponedlo en un plato y decorad con un poco de pimentón, un poquito de comino y un pelín de aceite.
____________________________________________________________

I must admit I'm a big eggplant fan. As a kid, I had problems eating eggplants, but now I only have no problems eating them but I love them. This is a slight variation over the mediterranean dish called babaganoush or mutabal. It's a slight variation because the mentioned disehes are usually made with grilled eggplant which has a caracteristic smoked taste and in this case we will be using microwave, so it will have a much softer taste. By the way, it's great to eat it with pita bread, mexican tortillas, chips... and it's also very quick to prepare.
 
 
 INGREDIENTS:
  • 2 eggplants
  • 1 garlic clove
  • 2 tablespoons olive oil
  • 1 teaspoon cumin
  • 1/2 teaspoon tahine (opcional)
  • Salt
All we've got to do is rinse the whole eggplants and put them in a plate, without drying them, and a bit of water into the microwave for 6 or 7 minutes. The time will depend on the size and tipe of eggplant, but once you touch them (beware not to burn) and you feel they are soft, they will be ready.
Cut them longwise in half and let them cool. With a teaspoon take the meat and put it in the blender vase. Add the garlic, olive oil, salt, tahine, cumin and blend slightly until you obtain a light cream.
Serve and decorate with a pinch paprika, a pinch of cumin and a bit of olive oil.

jueves, 2 de agosto de 2012

Ensalada de patata, yogur y salmón ahumado / Potato salad with yogurt and smoked salmon


Sigue haciendo un tiempo estupendo para dedicarse a las ensaladas fesquitas y que no nos tengan mucho tiempo metidos en la cocina. En este caso, variamos la típica ensalada de patata con mayonesa cambiándolo por yogur griego que aporta cremosidad y un ligero punto ácido que contribuye a aligerar a la patata.
INGREDIENTES (Para 4)
  • 3 patatas grandes o 4 medianas
  • 2 yogures griegos
  • 100g salmón ahumado
  • 2 cucharadas de cebollino picado
  • Sal
  • Pimienta
  • Agua
Echad agua en la olla o la cazuela y poned las patatas a cocer (enteras y con piel) hasta que pinchándolas estén blandas (no os digo cuanto tiempo porque dependerá del tipo de patata, el método de cocción y el tamaño). Dejad que se templen, peladlas y partidlas en trozos de unos 4 cm. Colocad las patatas en una ensaladera y salpimentadlas. Mezclad el yogur con el cebollino y echad por encima. Picad el salmón y agregad a la ensalada. Removed todo bien y servid :)
_____________________________________________
We're still having a marvelous weather in order to keep making salads and recipes that don't keep us much time in the kitchen. In this case, we make a change over the usual potato salad changing the mayonaisse for greek yogurt. This adds creamness and lightness to the salad as well as a smooth sour taste that helps making the potatoes less heavy.
INGREDIENTS (For 4)
  • 3 big potatoes or 4 medium size
  • 2 greek yogurts
  • 100g smoked salmon
  • 2 tablespoons of chopped chives
  • Salt
  • Pepper
  • Water
Add water to the presure cooker or the pot and cook the potatoes (whole and with skin) until soft (I don't specify time because different potatoes, ways of cooking and sizes make different times). Let them cool, peel them and cut them in aprox. 4cm pieces.
Place the potatoes in a bowl and add salt and pepper. Mix the yogurt with the chives and pour over the potatoes. Chop the salmon and add to the salad. Mix well and serve :)

jueves, 26 de julio de 2012

Sopa de Melón con taquitos de Ibérico / Melon soup with Iberico ham

Sigue haciendo un calor considerable y por ello pega tomar cosas fresquitas y ligeras para no entrar en coma después de comer. Desde el año pasado llevaba con ganas de hacer esta sopa. Había oído que era fácil, pero no sabía hasta que punto. Además, era la escusa perfecta para estrenar en las fotos los mini cuencos que me habían regalado (las A's, las G's, M, L y P) por mi cumple.
 
 
INGREDIENTES (Para 4)
  • 800g de carne de melón (sin cáscara ni pipas)
  • 125 ml de leche
  • 1 pizca de sal
  • Taquitos o virutas de jamón Ibérico (al gusto)
Pelad el melón y partidlo en trozos. Ponedlo en el vaso de la batidora (si vuestro vaso es grande, si no en un cuenco grande), añadid la pizca de sal y batidlo todo hasta que esté todo completamente licuado. Poned a enfriar.
Partid los taquitos en trocitos más pequeños (si no queda un poco demasiado contraste de texturas). Servid la sopa en los cuencos y adornad con el jamón.
Tomadlo bien fresquito :)
__________________________________________________

It's still really hot around here. Therefore it's feel like eating cool and light things so you don't doze after dinner.
por ello pega tomar   I've been wanting to make this soup since last year. I had heard that it was simple, but I've never thought it was that easy.
It was also a perfect moment to use in the photo shooting my new mini bowls that the A's, G's, M, L and P had gifted me for my birthday.
 
 
INGREDIENTS (For 4)
  • 800g melon (skin and seedless)
  • 125 ml milk
  • 1 pinch of salt
  • Iberico ham in dices or small pieces (as you prefer)
Peal the melon and cut it in pieces. Introduce them in the blender jar (or in a big, deep bowl if you are using a hand blender), add the salt and milk and blend until it's all compleatly liquid. Cool.
Cut the ham dices in small pieces (if they are too big the texture contrast is too much)
Serve in bowls and decorate with the ham.
Drink it really cool :)

viernes, 13 de julio de 2012

Copa de fruta veraniega/ Summer fruit parfait

¡¡Viva el verano y sus frutas!! Hay que ver que variedad de frutas hay en verano y lo buenas que están todas. Como además, a esto se une que ya estamos oficialmente en época antihorno (el calor no motiva a ello) hace que me plantee postres fresquitos. Aquí os dejo este que es muy fresco, sanísimo y lleno de sabor.
  
INGREDIENTES: (Para 4)
  • 8 albaricoques
  • 2 paraguayas o 1 1/2 melocotones
  • 20 cerezas
  • 2 yogures griegos
  • 2 cucharaditas de azúcar

Lavar y pelar y partid en daditos la paraguaya y los albaricoques. Lavad y deshuesad las cerezas, partidlas por la mitad y reservar 4 enteras para poner encima. En un cuenco mezclar el yogur con el azúcar. En el fondo de una copa de coctail (o cualquier otro recipeiente) poned el albaricoque y la paraguaya y sobre ellos las cerezas. Tapadlo todo con yogur (medio yogur por copa) y culminad con una cereza. Mantenedlo frío hasta antes de comerlo, pero no lo metáis en el congelador que las frutas perderán sus texturas.

¡¡Drisfrutadlo!! :)
________________________________________________
Hurray for the summer and it's fruits!!! There are so many fruits in summer and they're all so good. We have to add to it that we're officialy in a no-oven period (there's no will because it's too hot) so I have to look for cool and refreshing desserts.I post you this one that's cool, really healthy and flavourful.

INGREDIENTS: (For 4)
8 apricots
2 flat peaches (Saturn peaches) or 1 1/2 peaches
20 cherries
2 greek yogurts
2 teaspoons of sugar

Rinse, peal and cut in cubes the flat peaches and the apricots. Clean the cherries and debone them, cut them in half and keep 4 apart to top the dessert. In a bowl, mix the yogurt with the sugar. In a coctail glass put the apricots and flat peaches and over it spread the cherries. Cover with yogurt (half a yogurt per glass) and top with a cherry. Keep it cool before eating, but don't freeze it because the fruit will loose their textures.
Enjoy it! :)